How to Connect Your Web 3 Wallet to Orbiter Finance: A Comprehensive Tutorial

Welcome to Orbiter Finance, the ultimate platform for decentralized finance. By linking your Web 3 wallet to our platform, you can access a wide range of innovative financial services powered by blockchain technology. Whether you are a crypto enthusiast looking to grow your digital assets or a beginner interested in exploring the world of DeFi, this step-by-step guide will help you easily connect your wallet to Orbiter Finance.
Step 1: Choose a Web 3 Wallet
Before getting started, make sure you have a Web 3 wallet. We recommend using popular wallets like MetaMask or Trust Wallet, but any compatible wallet that supports Ethereum and other ERC-20 tokens will work. If you don’t have a Web 3 wallet, don’t worry – it’s easy to set one up. Simply visit the official website of your preferred wallet provider and follow their instructions to create a new wallet.
Step 2: Install and Configure Your Web 3 Wallet
Once you have a Web 3 wallet, install it on your preferred browser or mobile device. Follow the wallet’s installation instructions and set up a unique password to secure your wallet. After installation, configure your wallet by adding the Ethereum mainnet and any other networks you plan to use for interacting with Orbiter Finance. Make sure to back up your wallet’s recovery phrase or keystore file in a safe place as this will be crucial for wallet recovery.
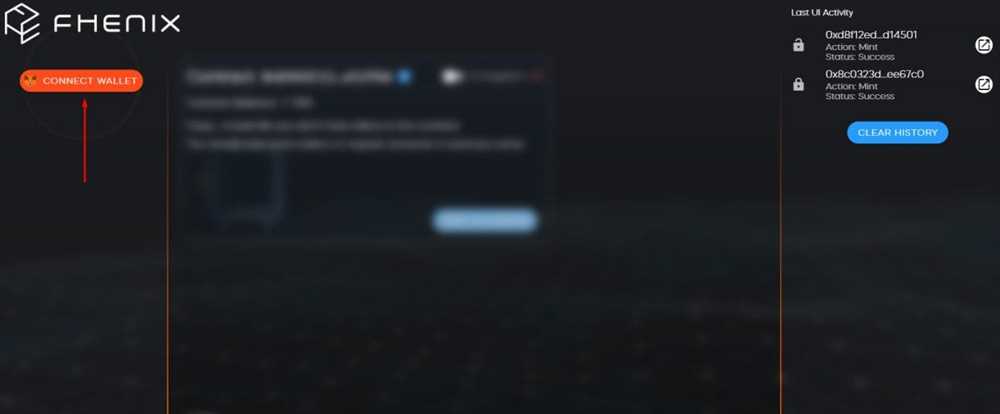
Step 3: Connect Your Wallet to Orbiter Finance
Now that your Web 3 wallet is ready, visit the Orbiter Finance website and click on the “Connect Wallet” button. This will prompt a pop-up window from your wallet provider asking for permission to connect. Select your wallet from the options available and grant it access. Congratulations! Your Web 3 wallet is now successfully linked to Orbiter Finance, and you can start exploring the wide range of DeFi services and investment opportunities we offer.
Remember to exercise caution when transacting and interacting with DeFi platforms. Always double-check the addresses you are sending funds to and be aware of potential phishing attempts. Orbiter Finance will never ask for your wallet’s private key or recovery phrase.
Now, you are ready to embark on your DeFi journey with Orbiter Finance. Start earning, investing, and exploring the exciting world of decentralized finance today!
How to Connect Your Web 3 Wallet to Orbiter Finance
Connecting your Web 3 wallet to Orbiter Finance is a simple process that allows you to take advantage of the platform’s features and functionalities. By linking your wallet, you can easily access and manage your funds, participate in token swaps, and engage in other decentralized finance activities.
Step 1: Choose a Web 3 Wallet
The first step is to select a compatible Web 3 wallet. Some popular options include MetaMask, Trust Wallet, and Coinbase Wallet. Ensure that you have installed and set up your chosen wallet before proceeding to the next step.
Step 2: Access Orbiter Finance
Visit the Orbiter Finance website and ensure that you are on the correct platform. Double-check the URL to avoid any phishing attempts. Once you are on the Orbiter Finance homepage, you are ready to move on to the next step.
Step 3: Click on the “Connect Wallet” Button
Look for the “Connect Wallet” button on the Orbiter Finance website. This button is usually located in the top right corner of the page or in the navigation menu. Click on the button to initiate the wallet connection process.
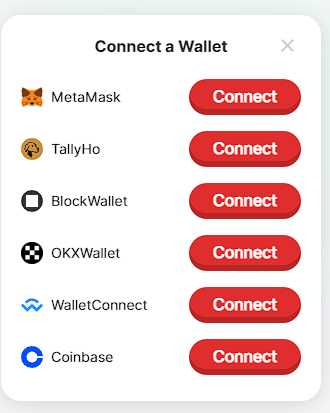
Step 4: Select Your Web 3 Wallet
A pop-up window will appear with a list of supported Web 3 wallets. Choose your installed wallet from the list.
Step 5: Authorize the Connection
After selecting your wallet, you will be redirected to your Web 3 wallet interface. Here, you will need to authorize the connection to Orbiter Finance. Follow the prompts and grant the necessary permissions to proceed.
Step 6: Confirm the Connection

Once the connection is authorized, you will be redirected back to the Orbiter Finance website. A confirmation message will appear, indicating that your wallet is successfully connected. At this point, you can start using your Web 3 wallet to interact with the platform.
Remember to keep your wallet secure and never share your private keys or seed phrases with anyone. Additionally, be cautious of phishing attempts and double-check the URL before entering any sensitive information. Happy exploring and trading on Orbiter Finance with your connected Web 3 wallet!
Step 1: Install a Web 3 Wallet

Before you can start using Orbiter Finance and linking your wallet, you will need to install a Web 3 wallet. This type of wallet is designed to work with decentralized applications (dApps) and allows you to securely store and manage your digital assets.
There are several popular Web 3 wallet options available, including:
- MetaMask: MetaMask is a browser extension wallet that supports multiple networks and provides a user-friendly interface for managing your cryptocurrencies.
- Trust Wallet: Trust Wallet is a mobile wallet app that is available for both iOS and Android devices. It supports a wide range of cryptocurrencies and allows you to interact with dApps directly from your phone.
- Coinbase Wallet: Coinbase Wallet is a mobile app that offers a secure and easy-to-use interface for managing your digital assets. It also supports decentralized finance (DeFi) applications.
Once you have decided on a Web 3 wallet, you can proceed with the installation process. Visit the official website or app store for your chosen wallet and follow the instructions provided to download and set up your wallet.
Make sure to carefully record your wallet’s recovery phrase or private key, as this is crucial for accessing and recovering your funds. It is also important to keep your wallet software up to date to ensure you have the latest security features and bug fixes.
Step 2: Create an Account on Orbiter Finance
In order to begin using Orbiter Finance, you’ll need to create an account. Follow the steps below to get started:
1. Visit the Orbiter Finance website: Open a web browser and navigate to the Orbiter Finance website at www.orbiter.finance.
2. Click on the “Sign Up” button: Once on the website’s homepage, locate the “Sign Up” button and click on it. This will take you to the account creation page.
3. Provide your email address: Enter your email address in the designated field. Make sure to use a valid email address that you have access to, as you may need it for account verification or password resets.
4. Choose a strong password: Create a secure password for your account. Aim for a combination of uppercase and lowercase letters, numbers, and special characters to maximize security. Make sure to remember your password or keep it stored in a secure location.
5. Complete the registration process: Follow the on-screen prompts to complete the registration process. This may involve verifying your email address, providing additional personal information, or agreeing to any terms and conditions.
6. Verify your account (if necessary): Depending on Orbiter Finance’s verification process, you may be required to verify your account through email or by providing additional identity documentation.
Note: It’s important to exercise caution when providing personal or financial information online. Make sure to verify the legitimacy of the Orbiter Finance website before creating an account.
Once you have successfully created an account on Orbiter Finance, you’ll be ready to proceed to the next step: linking your web 3 wallet.
Step 3: Connect Your Web 3 Wallet to Orbiter Finance
Once you have installed a web 3 wallet, the next step is to connect it to Orbiter Finance. This will allow you to securely manage your funds and interact with the Orbiter Finance platform.
To connect your web 3 wallet to Orbiter Finance, follow these simple steps:
Step 3.1: Access the Orbiter Finance Website
- Open your preferred web browser and navigate to the Orbiter Finance website.
- Click on the “Connect Wallet” button located in the top right corner of the website.
Step 3.2: Select Your Web 3 Wallet
Upon clicking the “Connect Wallet” button, you will see a list of supported web 3 wallets. Choose the wallet that you have installed and wish to connect to Orbiter Finance.
Step 3.3: Approve Wallet Connection
After selecting your web 3 wallet, you will be prompted by the wallet interface to approve the connection to Orbiter Finance. Review the transaction details and confirm the connection.
Once the connection is approved, your web 3 wallet will be linked to Orbiter Finance. You can now access your account balance, make transactions, and interact with the platform’s features.
Please note that the specific steps may vary slightly depending on the web 3 wallet you are using. However, the general process should be similar across different wallets.
Step 4: Start Managing Your Crypto Assets with Orbiter Finance
Congratulations! Now that you have successfully linked your Web 3 wallet to Orbiter Finance, you can start managing your crypto assets efficiently and securely. Orbiter Finance offers a range of powerful tools and features to help you track and optimize your portfolio, make informed investment decisions, and stay ahead in the ever-evolving world of decentralized finance (DeFi).
Portfolio Tracking: Orbiter Finance provides real-time updates and detailed insights into your crypto holdings. You can easily monitor the value of your assets, track price movements, and view your portfolio performance over time. This allows you to make data-driven decisions and take advantage of opportunities in the market.
Asset Optimization: With Orbiter Finance, you can optimize your crypto portfolio by rebalancing your assets based on your investment strategy. The platform offers advanced algorithms that analyze the market and suggest appropriate adjustments to maintain your desired asset allocation. This helps you maximize returns and minimize risks.
Investment Insights: Orbiter Finance provides comprehensive market analysis, including price charts, historical data, and valuable metrics. You can access the latest news, trends, and expert opinions to make informed investment decisions. Stay updated with the market conditions and seize profitable opportunities quickly.
Security and Privacy: Orbiter Finance prioritizes the security of your funds and personal data. The platform is built on a decentralized architecture, which means that your assets are stored securely on the blockchain. Additionally, your privacy is protected through encryption techniques and user-controlled data sharing.
User-Friendly Interface: Orbiter Finance offers an intuitive and user-friendly interface, making it easy for both beginners and experienced users to navigate and manage their crypto assets. The platform is equipped with helpful tooltips and guidance to ensure a smooth and enjoyable user experience.
By utilizing the powerful tools and features provided by Orbiter Finance, you can take control of your crypto investments and stay ahead in the dynamic world of DeFi. Start managing your crypto assets today and unlock the potential of decentralized finance!
What is Orbiter Finance?
Orbiter Finance is a decentralized finance (DeFi) platform built on the Ethereum blockchain that offers various financial services and tools to its users.
Why is it important to link my Web 3 wallet to Orbiter Finance?
Linking your Web 3 wallet to Orbiter Finance is important as it allows you to securely access and manage your funds on the platform. It also enables you to interact with the different features and services offered by Orbiter Finance.
How can I link my Web 3 wallet to Orbiter Finance?
To link your Web 3 wallet to Orbiter Finance, you need to follow a step-by-step process. First, visit the Orbiter Finance website and click on the “Connect Wallet” button. Then, select your preferred Web 3 wallet provider, such as MetaMask. Follow the instructions provided by the wallet provider to connect your wallet to Orbiter Finance.
What Web 3 wallet providers are supported by Orbiter Finance?
Orbiter Finance supports various Web 3 wallet providers, including MetaMask, MyEtherWallet, Trust Wallet, and Coinbase Wallet. You can choose your preferred wallet provider and link it to Orbiter Finance.
Is linking my Web 3 wallet to Orbiter Finance secure?
Yes, linking your Web 3 wallet to Orbiter Finance is secure. The platform uses advanced security measures, such as encryption and secure connections, to protect your wallet information and funds. However, it is always advisable to ensure that you are using the official Orbiter Finance website and not a phishing site to avoid any security risks.


